A keratin treatment is a popular way to smooth and straighten frizzy, unruly hair. While getting the treatment done at a salon can be pricey, doing a keratin treatment at home is a budget-friendly alternative. With the right products and techniques, you can achieve salon-quality results in the comfort of your own home. In this guide, we will walk you through the step-by-step process of doing a keratin treatment at home, so you can enjoy smooth, frizz-free hair without breaking the bank. Let’s get started!

Everyone wants smooth hair, but if you’re anything like me, then you weren’t born with it. I wouldn’t say my hair is insanely crazy (I feel for the people who have it worse than I do), but it also isn’t smooth by any means.
Especially in the humid months, my hair tends to straight up frizz. I don’t get pretty natural curls or a nice wave, I just get somewhat straight hair that’s frizzy. For the most part, I can easily control that by quickly straightening it in the morning, but in the summers when the weather is the most humid it can be 100% impossible.
I got my first Keratin Treatment when I was living in Miami, with good reason! The weather is so humid in Florida (even in the winter) that you can straighten your hair, walk outside, and have strands that look like you haven’t used a heat tool in your life.
For my first treatment, I was able to find someone (recommended to me by a friend) who did hair on the side, so the treatment wasn’t as pricey as it normally is. I remember 4 or so days after the treatment (when I finally could wash my hair) and being amazed by how different my locks were and how easily they could be styled. Sure, the Keratin makes your hair a little flat, but it’s literally nothing compared to how long I had been fighting with the humidity.
I went back to this person for the next few times, then that was no longer an option. I tried my first salon Keratin experience (for a pricey $495) and it didn’t work.
The problem is that every salon does it a little different, so not only do you have to shell out upwards of $500 and sit in a chair for 4 hours, but it might not even work. I quickly realized I needed to take a more frugal towards Keratin treatments, especially if I wanted to get them regularly.
Where to Find the Products
Keratin isn’t usually available unless you’re a registered hairdresser, which I’m certainly not. Luckily, after hours of digging, I was able to find this product. It’s the real deal and works as well as any salon product. You can tell it’s a legit Keratin treatment as soon as you start using heat with it – the smell is terrible.
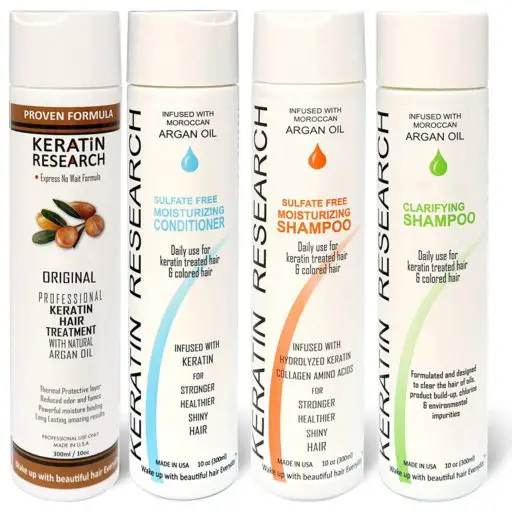
Shop Here
At the very least, you need the Keratin treatment and a good clarifying shampoo. This comes with a shampoo and conditioner that I absolutely love (it makes your hair incredibly soft without being greasy and definitely preserves the life of your treatment), but if you need something cheaper, click here for the Keratin and clarifying shampoo without the extras.
You don’t need a ton of tools to do the treatment. Other than the actual products, you need a good flat iron (otherwise you’ll break off way more hair), a blow dryer (any type works), a round brush, an applicator brush, and a straightening comb (a regular comb works too, it’s just more time consuming).
How to Do the Treatment
This is the part that takes a while. At first I was annoyed, but I realized that it takes just as long in the salon and costs way more money. Either way, it’s a time consuming project, so you might as well do it at home while watching Netflix.
1. Wash your hair with the clarifying shampoo. Don’t use conditioner. Comb your hair out and leave it pretty damp (you don’t want any dry pieces at all).
2. Brush on the Keratin Treatment. I put it in a bowl and use the brush to apply it to each section of my hair. If you have a lot of hair, then I suggest clipping portions of it up and working in sections. You want to apply a good amount to each strand – be generous. I’ve noticed that when I don’t use enough, it ends up feeling like I didn’t do the treatment within a week. You don’t want to waste 4 hours.
3. Comb out the treatment. Here I use the combing tool to get out the excess so you don’t have big clumps. Take this with a grain of salt – only comb each piece once and make sure you leave enough of the treatment on the hair. Your hair might feel a little greasy for the next three days, but it’s better to have that than to be wasting your time. I think the many salons over comb the hair and that’s why the treatments don’t always hold.
4. Blow dry your hair. I dry mine in general sections until it’s 85% dry, then I start to use the round brush to blow out each piece. Do this until you’ve given all of your hair a blowout and it’s nice and smooth.
5. Straighten each piece. I do this in sections as well. You need to straighten every single piece 5-8 times. This part might smell really bad, and you could see a lot of steam coming from the flat iron. Do it in a well-ventilated room because the chemicals definitely aren’t good to be breathing in. It does burn your hair a little, but I personally feel that since I’ll use the flat iron less in the next few months, it’s actually more helpful than harmful.
You want your hair to be perfectly straight and flat to your head when you’re done. Tip: the straightener needs to be at least 400 degrees to seal the Keratin properly (it’ll just wash out otherwise). If you’re unsure whether you’ve straightened enough, go over each piece two more times.
6. Wait three days before washing your hair. This part is really hard for me. I’m a wash your hair every day type of girl, but it literally doesn’t work if you don’t wait the three days. During this period, if any pieces start to look weird or bent, just re-straighten them back to position.
This Keratin treatment should last 2-4 months. If you do it really well, you can literally forget about straightening your hair during those months. While it takes a good 4 hours, you’re probably saving way more time from your daily routine.
After doing the treatment, be sure not to use any shampoos that contain sulfates (as this will just strip the Keratin away within a few washes).

In conclusion, doing a keratin treatment at home can be a cost-effective and convenient way to achieve smoother, shinier hair. By following the steps outlined in this guide, you can effectively treat your hair and minimize frizz without having to visit a salon. Remember to choose a high-quality keratin treatment product and to carefully follow the instructions for best results. With a little patience and care, you can enjoy the long-lasting benefits of a keratin treatment in the comfort of your own home.